Pages

CodeEval Stepwise Word

Write a function that, given in input a list of words, gives back the longest one, in a stepwise fashion. This is the 202 CodeEval problem. Here I am going to show my Python 3 solution.

Firstly, I have converted their example in unit tests. Having a look at them should be clear what they mean for "stepwise".
def test_provided_1(self):
    result = solution('cat dog hello')
    self.assertEqual('h *e **l ***l ****o', result)

def test_provided_2(self):
    result = solution('stop football play')
    self.assertEqual('f *o **o ***t ****b *****a ******l *******l', result)

def test_provided_3(self):
    result = solution('music is my life')
    self.assertEqual('m *u **s ***i ****c', result)
Then, I have divided the problem in two parts. Finding the longest word, and then converting a word in the weird format required.

The longest word could be found in linear time. It is just a matter of keeping track of the currently found solution, comparing its size against the other candidates until a better solution is found or we reach the end of the list:
def get_longest_word(line):
    words = line.split()
    selected = ''
    for word in words:
        if len(word) > len(selected):
            selected = word
    return selected
I get the "stepwise" format by concatenating a growing number of stars followed by the actual character for each step, and then pushing the result in a temporary list. Finally, I join the list on a blank to get the expected string:
result = []
for i in range(len(word)):
    result.append('*' * i + word[i])
return ' '.join(result)
I submitted successfully my solution to CodeEval, and then I have pushed to GitHub both the unit test and the python3 source file.

Go to the full post

A Python function

In the official Python tutorial as an example of function is showed a piece of code that calculate the Fibonacci series. Among the language features on display there, we can also see the handy way of assigning values to more variables in a single operation. Reading it, I though "Cool. But we don't really need two of them there".

So, just for the fun of it, I refactored the function to get rid of the extra variable.

Here is the original code, as you can find it on the python.org tutorial page:
def fib2(n):
    result = []
    a, b = 0, 1
    while a < n:
      result.append(a)
      a, b = b, a+b
    return result
You see the point. It is nice to initialize and modify a and b in the same line, since they are so strictly connected. However, just a single buffer integer is required, since we can refer to the list we are going to return. Well, at least if we can assume that the user won't pass as parameter a value less than one.
def fibonacci(n):
    result = [0]
    candidate = 1
    while candidate < n:
        result.append(candidate)
        candidate += result[-2]
    return result
In comparison with the original function, my version loose the example of comma-assignment functionality. However I use the increase-assign (+=) operator and the negative index support on list. I would say it is a tie.

Go to the full post

CodeEval Fizz Buzz

Do you know the Fizz Buzz game? We take a couple of number, say 2 and 3, call the first one Fizz and the second Buzz. Then we say the numbers as they are in the natural series, uttering "Fizz!" instead of the first number (2 in my case) and all its multiples, and Buzz for the second and multiples. If a number is a multiples of both of them I should say "FizzBuzz!".

The reason to talk about it here is that Fizz Buzz is the first Codeeval problem, and here I am going to present my Python 3 solution to it.

As usual, I started writing a few test cases. In this case I merely converted the two examples provided by CodeEval in Python Unit Tests:
class TestFizzBuzz(unittest.TestCase):

    def test_provided_1(self):
        result = solution('3 5 10 ')
        self.assertEqual('1 2 F 4 B F 7 8 F B ', result)

    def test_provided_2(self):
        result = solution('2 7 15 ')
        self.assertEqual('1 F 3 F 5 F B F 9 F 11 F 13 FB 15 ', result)
When Fizz is 3, Buzz is 5, and we want to go through the first 10 numbers, I should get what showed in the first test case.
A bit more interesting the second one, where 14, should generate a FizzBuzz result.

Being myself a C/C++ programmer at heart, I came out with a first solution in line with my background:
def solution(line): #1
    result = [] #2
    x, y, n = map(int, line.split()) #3
    for i in range(1, n + 1): # 4
        fb = False # 5
        if i % x == 0: # 6
            fb = True
            result.append('F')
        if i % y == 0:
            fb = True
            result.append('B')
        if not fb: # 7
            result.append(str(i))
        result.append(' ') # 8

    return ''.join(result) # 9
1. The parameter line is supposed to be a character string.
2. I would push each result in a list of strings, and in the end I will convert the list to a single string. This is done for efficiency reasons, being a Python string immutable.
3. Extract the values passed by the user. Notice that no error handling is done here, we boldly assumes we have three blank-separated meaningful numbers in it. For the rules of CodeEval this is our expected way of programming. Don't do that at work. Besides, notice also that I have used the Python built-in map function to convert the strings generated by split() to integers.
4. Loop on the natural series, starting from one up to n, as required by the caller. Since Python use the right-open interval concept, I had to increase n by one to get the expected behavior.
5. The problem has a tiny complication. We need to keep track if a number is either multiple of Fizz or Buzz. To achieve this result I use a boolean variable that I named fb.
6. If the current number is a Fizz (or a Buzz) push its letter to the result list.
7. If it is not a Fizz/Buzz push its actual value to the list. But be careful, we want it as a string, so we have to explicitly convert it to that type.
8. A single blank is added as separator.
9. Finally, we convert the list to a string, by joining it.

This code works fine. However anyone could see that it has been written by a C/C++ programmer. By the way, after writing it, I checked in the blog and I found out I had already written a post on this CodeEval problem, proposing a C++ solution. As you can see, the code looks like a transcription of the same concepts with minimal variations.

I decided to think to a more pythonesque solution, and I came out with this:
def solution(line):
    x, y, n = map(int, line.split())
    result = [
        (((i % x == 0) * 'F' + (i % y == 0) * 'B') or '%d' % i) + ' '
        for i in range(1, n + 1)
    ]
    return ' '.join(result)
Basically, is the same thing. However, I moved the for loop inside the list initialization, and I used the clever trick of multiplying a letter for a boolean, knowing that False means zero and True one. Then using the or operator to check if any Fizz/Buzz has been detected and, if not, pushing in the list the number, converted to string.

On GitHub you can find the full Python 3 source code for the unit test and the actual solutions.

Go to the full post

A more springy Hello World

I am going to modify my Spring Boot Hello World application to let it be a bit more springish. The first version was the bare minimum to check that the STS installation was working fine. The second one was a proper, even if minimal, Web Service. The third one added logging capabilities.

Ensured that all this basic stuff works properly, I can confidently move to something more interesting. Let's say hello using IoC (Inversion of Control) and DI (Dependency Injection).

I create a dedicate package for the logic related stuff for my hello project. Not surprisingly, I name it logic, and I put it under the hello package.
Actually, there's not much logic in this app, I just want to greet users. This suggests me to create an interface, Greeter, that exposes the a single greeting method.
The GreetingController changes accordingly. I remove the logic in it, delegating the work to the actual class that is going to implement the Greeter interface.
Notice how much more cleaner is this way of working. The controller doesn't know anymore about how a greeting is generated. It just knows that exists a Greeter interface, it holds a reference to it that is annotated as a Resource, a javax annotation, and through it, a greeting() method would be called to answer to the user request.

I create a couple of concrete classes implementing Greeter to give a sense to this architecture. There are about identical, in the real world things are usually more complicated. Here is the PlainGreeter, its brother MockGreeter is about the same.
Notice how the relation between the controller and the concrete Greeter is set. Before IoC it was commonly considered a controller task to define a dependency with the Greeter. In a way or another, an instance of the actual Greeter was created and used. Now IoC rules, so we perform an Inversion of Control. Is the Greeter that signal to be available for the controller, and the framework, Spring here, that take care of making it work.

I use annotation to implement the IoC relation, and you can see how in the code.
In the controller I have annotated its Greeter data member as Resource. This javax annotation tells Spring that Dependency Injection should be used here.
Each concrete class implementing the Greeter interface that could be a target for DI should be marked as Component, a springframework stereotype annotation.

Finally, we have to tell Spring which among the available Components should be injected in the controller Resource.

An handy way to do it is combining configuration and annotation. In the Spring configuration file I specify which profile is the active one
spring.profiles.active=prod
Then, I add a springframework context Profile annotation to each component, marking with the active profile only the one I want to be used. Be careful on it. Here is the exception that I get at startup if I mark both my components as "prod":
org.springframework.beans.factory.BeanCreationException:
 Error creating bean with name 'greetingController':
 Injection of resource dependencies failed; nested exception is 
org.springframework.beans.factory.NoUniqueBeanDefinitionException: 
 No qualifying bean of type 'dd.manny.hello.logic.Greeter' available:
 expected single matching bean but found 2:
 mockGreeter,plainGreeter

This Spring Boot project is on github. You could be mainly interested in these files:

Go to the full post

Logging in Spring

Spring has been designed to use the Apache Commons Logging, often called JCL from its previous name, Jakarta Commons Logging. It acts as a wrapper (more technically, bridge) hiding the actual log library used by the application. By default, Logback is assumed.

JCL provides six level of logging, from trace to fatal. To show how it works, I have modified the greeting method from my simple Web Service I am playing with:
private static final Log log = LogFactory.getLog(GreetingController.class);

public String greeting() {
 log.trace("trace hello");
 log.debug("debug hello");
 log.info("info hello");
 log.warn("warn hello");
 log.error("error hello");
 log.fatal("fatal hello");
 return "Hello";
}
LogFactory is the apache.commons.logging class that acts as a factory to create a log object.

If I consume the service, I get something like this:
I see some logging in the console window generated by my app, with a couple of surprises. I miss trace and debug messages, and the fatal one is showed as a plain error.

The latter is a feature, not a bug. Since Logback has no fatal level, JCL maps a fatal request to the error level.
The first one is the default behaviour common to many loggers. If I don't specify which level of logging I want to display, only messages from info level onward are shown.
Here I want to see the full logging, so I add this line to the Spring application.properties file:
logging.level.dd.manny=trace
I restart my Spring application, consume the service, and I get the expected changes in the log.

Log to file

By default, when I ask Spring to log to file, it sends the messages to a file named spring.log, it is usually a good idea to keep this name, however it make sense to place this file in a specific folder. To do that, I add this line to the Spring properties file:
logging.path=/tmp
Last thing. I want to log _only_ to file. To do that I have to mess a bit with the actual logger (once again, in this case Logbackis assumed) configuration file. I am simply using the default one provided by Spring, specifying FILE as appender in the root element:
<root level="INFO">
 <appender-ref ref="FILE" />
</root>
Only the Spring banner is printed to standard output, the log goes straight to file.

The full Spring Boot project is on github. The relevant files are GreetingController.java, application.properties, and logback.xml.

Go to the full post

Packaging Spring to a jar or war

This is going to be a boring post, the flip side is that is short. I am working with Spring STS and Maven, I have already written a simple Hello World web service for Spring using Boot, and letting it use the default built-in Tomcat application server.

Let's spend some words on how to actually create the fat jar that could be run from the shell, automagically running the embedded Tomcat and the web services in it, and then how to generate instead a plain old war that could be deployed in a stand alone Tomcat.

Fat jar

The first alternative could be achieved in a click, run the Maven install goal for the project. I can either run it from the project root or, as showed below, from its pom.xml element.

The first time I ran it, I saw an annoying warning message in the log:
[WARNING] The requested profile "pom.xml" 
 could not be activated because it does not exist.
To get rid of it, I removed a spurious Maven profile from the project properties

Warning or not, Maven does its job, and I see a jar generated in the target folder, that I can run from the command line. Something like this:
...\helloSpring\target>java -jar hello-0.0.1-SNAPSHOT.jar
Nice.

Classic war
If I want to get a plain old war to be deployed on an already existing application server, a few changes are required.

Java code changes

My HelloSpringApplication class should extend SpringBootServletInitializer and should override the configure method. Pay attention to the super class package, the old one, in the context.web package is now deprecated for the new web.support one.
package dd.manny.hello;

import org.springframework.boot.SpringApplication;
import org.springframework.boot.autoconfigure.SpringBootApplication;
import org.springframework.boot.builder.SpringApplicationBuilder;
import org.springframework.boot.web.support.SpringBootServletInitializer;

@SpringBootApplication
public class HelloSpringApplication extends SpringBootServletInitializer {

    public static void main(String[] args) {
        SpringApplication.run(HelloSpringApplication.class, args);
    }

    @Override
    protected SpringApplicationBuilder configure(SpringApplicationBuilder application) {
        return application.sources(HelloSpringApplication.class);
    }
}

Configuration changes

In the POM file, the packaging element under project is now set to war, and not anymore as jar:
<packaging>war</packaging>
Then, a new dependency should be added:
<dependency>
    <groupId>org.springframework.boot</groupId>
    <artifactId>spring-boot-starter-tomcat</artifactId>
    <scope>provided</scope>
</dependency>
And the spring-boot-maven-plugin plugin removed.

After these changes, when I run pom.xml as Maven install, I generate a war, slimmer than the original jar, that now I can deploy to my Tomcat server.

Go to the full post

A RESTful Web Service saying hello

Here I am completing the example started in the previous post, aimed at writing a simple Spring application using STS. I have ensured the app framework is working fine, now I write a very simple REST Controller.

I have already pushed the code on GitHub, however the job is so easy I don't mind to redo it from scratch. So, I create a Java class named GreetingController in the package controller under my already existing hello package
I annotate it as RestController and I provide it with a public method that returns a String, annotated as RequestMapping:
@RestController
public class GreetingController {
    @RequestMapping("/greeting")
    public String greeting() {
        return "Hello";
    }
}
And that's it!

Let's see it in action. I go to the Boot Dashboard, and I start my helloSpring application.
Whoopsie daisy, I forgot to set the port of my Tomcat server to something different from the default 8080, that is already taken on this box. The result is a long scroll of complaints in the Console window, starting with an exception dump:
java.net.BindException: Address already in use: bind
Ending with an error description (The Tomcat connector configured to listen on port 8080 failed to start. The port may already be in use or the connector may be misconfigured.) and the action (Verify the connector's configuration, identify and stop any process that's listening on port 8080, or configure this application to listen on another port.) we should take to solve it.
There is a number of ways you could follow to solve this issue. Here I set the server port in the Spring application properties file, defined in the src/main/resources folder
When I restart Tomcat, I see I have a clean log
And now I can check on a browser how it works
Good!

Go to the full post

Hello Spring Boot

I have installed Spring STS on a Windows box, and to check that everything is OK, I am writing the usual Hello World program. I have already did it for a previous version and stored the source code on GitHub.

However, it is more fun to do it again from scratch.

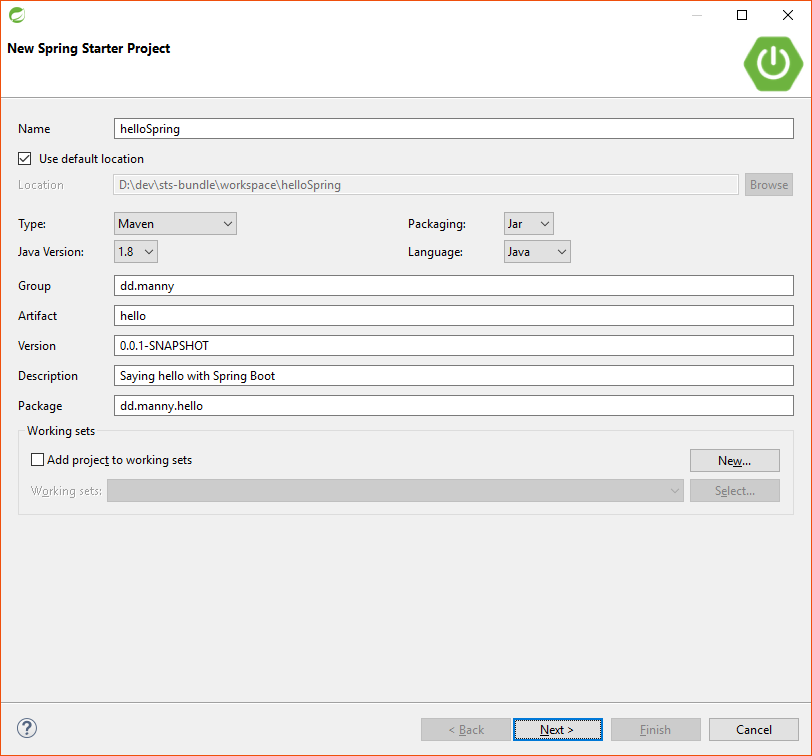
From the menu File, I select the wizard to create a New Spring Starter Project.

Then I fill the required fields to specify the project name and a few extra information. I am going to keep much of the proposed default values.
Next page, I keep the default Spring Boot Version, currently 1.4.3, and I add just one extra dependency, Web.
Clicking on Next, we can check what the wizard is doing for us, using the Spring Initializr web site passing the expected parameters. Otherwise, we can simply Finish, and let STS do the work for us.

A few seconds later, I have my new shiny helloSpring project. I open the project POM (remember that I accepted the default project type, Maven), and I am not surprised to see it reflects the selections I have chosen by the wizard.
In the Spring Elements sections, there is a new bean, whose name is based on the name I gave to the project, in this case HelloSpringApplication. Let's have a look at its source code.
The class is in the dd.manny.hello package, as I asked in the wizard, and has been annotated as @SpringBootApplication. It contains a main() method that calls SpringApplication.run() passing as parameters the class itself and the args passed to the application. We expect that on startup Spring sees this is the booting class, and uses its main to call the SpringApplication run() method.

To run my hello application, I now go to the Spring Boot Dashboard. By default, you should find this view on the bottom left in your STS window. If missing, you could get it back from Window - Show View
In the Boot Dashboard Local list I see my application, I select it, and now I can start the associated process. In the console window I can see the resulting logging.
Among the messages, I see a couple of them issued from my class, dd.manny.hello.HelloSpringApplication:
Starting HelloSpringApplication on a555 with PID 8552 
Started HelloSpringApplication in 1.348 seconds (JVM running for 1.995)
Good. The application worked fine.

Go to the full post

Splitting a string in plain C++

To split a string I would normally use the Boost tokenizer function. Sometimes I can't. For instance when I am having fun in solving some online programming problem, where no extra library could be used. In this case I fall back to this homemade split function.

boost::tokenizer() is smarter, however this bare version is usually enough for what I need:
std::vector<std::string> split(const std::string& input, char sep) // 1
{
    std::vector<std::string> tokens;
    std::size_t beg = 0, end = 0; // 2
    while ((end = input.find(sep, beg)) != std::string::npos) // 3
    {
        if(beg < end) // 4
            tokens.push_back(input.substr(beg, end - beg));
        beg = end + 1; // 5
    }
    if(beg < input.size()) // 6
        tokens.push_back(input.substr(beg));

    return tokens;
}
1. It accepts in input a constant reference to the string we want to split and the unique character expected as separator. As output we get the found tokens in a vector of strings.
2. I am going to loop on the input string, putting in beg and end the delimiter positions for each token.
3. Find the next position for the separator, until one of them is available at all.
4. If the token is not empty, extract it from input and push it in the tokens vector.
5. The next token would start after the current separator position.
6. Push the last token, not considering a possible empty one at the end of the input string.

As example, see how I have used this split() function to solve the Swap Numbers codeeval problem, that asks to swap the first and last character in each word in a blank separated string:
std::string solution(const std::string& input)
{
    std::vector<std::string> words = split(input, ' '); // 1
    for(std::string& word : words) // 2
        std::swap(word.front(), word.back());

// ...
1. Using the above defined split() function on the input string for the blank separator.
2. Each word in the vector has its first and last character swapped.

Go to the full post

CodeEval magic numbers

We have to detect all the numbers in a given interval that are "magic".

You could find the full description of the problem, and input your solution, on CodeEval.
The most interesting part is the description of the numbers we consider as magic:

* No digits repeat.
* Beginning with the leftmost digit, take the value of the digit and move that number of digits to the right. Repeat the process again using the value of the current digit to move right again. Wrap back to the leftmost digit as necessary. A magic number will visit every digit exactly once and end at the leftmost digit.

6231 is magic because there is no duplicate digit and:
* in position 0 there is a 6, move to position 2 -> (0 + 6) % 4 = 2
* in position 2 there is a 3, move to position 1 -> (2 + 3) % 4 = 1
* in position 1 there is a 2, move to position 3 -> (1 + 2) % 4 = 3
* in position 3 there is a 1, move to position 0 -> (3 + 1) % 4 = 0

Stripping down all the less interesting code, here is how implemented this algorithm in C++.

Firstly ensure there is no duplicated digit in the number:
for(auto it = number.begin(); it != number.end(); ++it)
{
  if(std::find(it + 1, number.end(), *it) != number.end())
    return false;
}
Then loop on the digits until we land on a digit that we have already visited:
std::vector visited(number.size(), false);
int pos = 0;
while(!visited[pos])
{
  visited[pos].flip();
  int cur = number[pos] - '0';
  pos = (pos + cur) % number.size();
}

Finally return success if we ended at the beginning of the string and all the digits have been visited:
return pos == 0 && std::find(visited.begin(), visited.end(), false) == visited.end();

Go to the full post

CodeEval knight moves

Given the position of a knight on the chessboard, return all its possible moves. In alphabetical order.

You could solve this problem as a CodeEval easy challenge.

It came natural to me to solve it in a functional way, still writing C++11 code.

My solution function would put the result in a string using a local lambda function:
std::string result;

auto push_back = [&result] (char x, char y)
{
  result.push_back(x);
  result.push_back(y);
  result.push_back(' ');
};
Nothing of much interest here. My push_back() lambda captures the result string, and push back to it its parameters, adding a blank at the end as separator for the possible next element.

More interesting this other lambda. It captures the string passed as input parameter, that would contain the current knight position in a format like "g2", and the above defined push_back lambda. As parameter it gets the column where I want to move the knight and how many squares I could move up or down:
auto add = [&input, &push_back](char x, int step)
{
  if (input[1] > '0' + step)
    push_back(x, input[1] - step);
  if (input[1] < '9' - step)
    push_back(x, input[1] + step);
};
If the knight does not fall off the chessboard, I push back the resulting positions using the push_back lambda. Now I just have to call add() for each meaningful column. I can do that in this way:
char x = input[0];
if (x > 'b')
  add(x - 2, 1);
if (x > 'a')
  add(x - 1, 2);
if (x < 'h')
  add(x + 1, 2);
if (x < 'g')
  add(x + 2, 1);
Just for readability, I introduced the x variable that should contain the name of the column where the knight is placed. If it is to the right of the 'b' column, I could move two steps to the left, and then call the add() lambda to verify if it could be moved one square more up or down. And so on. Full C++ code is available on github. As well as a few test cases.

Go to the full post

CodeEval string permutations

Given in input a string that could contains letters and numbers, we should output all its permutations comma separated and alphabetically ordered according to the usual conventions.

This is a CodeEval sponsored challenge, so I'll just write here a few hints and not the full solution.

There is a very useful C++ STL function that does all the job for us, namely std::next_permutation(). It assumes the collection it works on has been in the initial state, and it modifies it to the next permutation, until there is anything to permutate. When there is nothing more to do, it returns false.

So we would std::sort() our collection - that should be modifiable, and then std::next_permutation() it in a loop, storing the permutations in a temporary buffer, or maybe directly outputting it to standard output.
std::sort(s.begin(), s.end());
// ...
do {
  // ...
} while (std::next_permutation(s.begin(), s.end()));
The only minor nuisance left now is the comma. We should add it to each permutation but the last one. There are a number of ways to address this point, for instance you could see it in a different perspective. Each permutation has a comma before it, but the first one. Or maybe you could blissfully ignore the point when you build the solution, and simply remove the last character before returning your solution. If you are following this strategy, the C++11 pop_back() std::string method could be useful.

If pop_back() is not available yet on your compiler, here is an alternative solution:
s.erase(s.size() - 1, 1); // s.pop_back();
In any case you should remember to check the size of your input string. If it is empty or consisting of just one character there is nothing to do. Otherwise you are safe in assuming there is something you could erase in the resulting output.

Go to the full post